J4W 11.0 + CWMS 2.5 = CSCuu81060

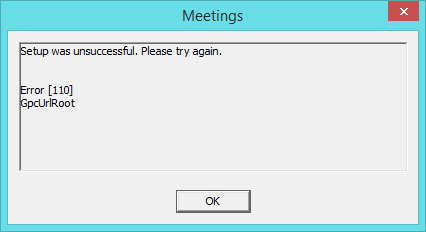
Since Jabber 11.0 has been officially released and posted on CCO, we have done a company-wide upgrade from 10.6 to 11.0. Shortly after, our end users started complaining about inability to start or join WebEx meetings. The error (in a form of pop-up) reads as follows: “Setup was unsuccessful. Please try again. Error [110] GpcUrlRoot“:

CWMS: Setup was unsuccessful

All affected users had IE as their default browser – that was clue #1. All affected users had Jabber 11.0 installed on their workstations – clue #2. Surely, prior to this massive deployment, IT has extensively tested this and all prior (beta) Jabber 11 releases under EAP, but no one in IT had IE set as default browser (can’t blame them). Hence, this defect has not been detected.

We’ve opened a case with Cisco TAC to troubleshoot the issue further. After playing with Trusted Sites list and zone security settings, it seemed that we had found the workaround. However, the TAC engineer who was assigned to our case just advised us of the defect CSCuu81060 which reads as follows:

Symptom:
When running Jabber 11 and 2.5 MR5+, Jabber 11 changes the GPC patch to C:\Program Files (x86)\Cisco Systems\Cisco Jabber\MeetingSDK\JabberMeeting\NewDS\MyWebex\ieatgpc.dll

This is not compatible with CWMS and causes WebEx meetings to be unable to start from IE/Productivity tools due to being unable to match the activex control used by CWMS when launching a meeting from IE/PT

Conditions:

Workaround:
Use a tested compatible version of Jabber as per documentation: http://www.cisco.com/c/en/us/td/docs/collaboration/CWMS/2_5/Planning_Guide/Planning_Guide/Planning_Guide_chapter_01100.html#reference_71EE5F550E5D4E89B982F64F16DCD0C2

Verified-release 11.0(1) 10.6(6)

So far, adding the FQDN of the CWMS to the Trusted Sites list seem to have done the trick for some users (you may need to tweak the Trusted Sites security zone to achieve the right effect). Another workaround is to set Chrome or Firefox as your default browser or use those browsers exclusively to launch WebEx meetings until a fix is released. Also waiting for some feedback from Cisco Jabber/CWMS Product Teams so hopefully will have an update for you soon.
Cisco Unity Connection: “Failed to Send Message”

I took a long break from blogging, not because there’s nothing to blog about, but because I’ve been tremendously busy at work. Since my last post, I have moved the blog to another hosting provider (which by the way wasn’t a big deal: getting a new account, spinning a new WordPress instance and restoring posts and media from backups is super-easy these days), attended a Cisco Live! conference in San Diego (awesome experience), and migrated about half a dozen of telephony systems to Cisco Unified Communications Manager clusters (with voicemail, Jabber and all nine yards). Oh, and I have replaced my daily workhorse (a Dell Latitude for, well, another Dell Latitude).

Returning back to the topic of this post, I got frustrated trying to upload a WAV file with a greeting to a system call handler in Unity Connection, as Java was giving me the ambiguous “Failed to Send Message” error. The frustrating part was that I have already dealt with the issue a while ago, but the problem resurfaced with the new laptop of mine and I couldn’t remember what the fix was. You can obviously Google the error message and get a couple of links to posts on Cisco.com, but some of the info was not applicable for Unity Connection 10.5 that I was using. So for anyone out there who is looking for a definite solution, here it is.

To start, the issue is definitely JRE-related. After clicking about half a dozen of “Accept” Java security prompts and finally managing to launch the embedded Java applet in the Unity Connection greeting administration page, the “Failed to Send Message” appears after uploading WAV file and hitting the “Save” button.

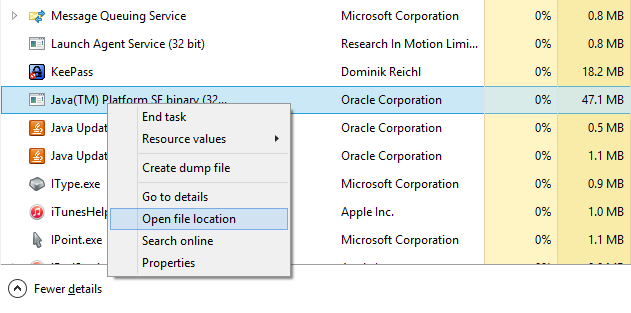
First, figure out which JRE version is being used in the web page. To do that, open the task manager as you have the Greeting page with a Java applet opened. In the list of running processes locate the JRE process, right-click on it and select “Open File Location”:

jre_process

Next, launch the notepad as Administrator and open the java.policy file located under ..\lib\security\ folder and append the following lines anywhere between the “grant {” and “};” to add the required permissions:

permission java.net.SocketPermission "10.10.10.10:443", "connect,resolve";
// where 10.10.10.10 is the IP Address of your Cisco Unity Connection server
// and 443 is the default HTTPS port (for BE6K you would want to use 8443 instead).
// If you have multiple nodes, add each one in the same list
// It may also help to add the FQDN or the hostname of your Unity Connection, if you open the admin page by using either of the two:
permission java.net.SocketPermission "cuc-01.mydomain.com:443", "connect,resolve";
// where cuc-01.mydomain.com is the FQDN of your Cisco Unity Connection server

Close the file, saving changes, re-launch the web browser and try again. It should work this time.