CUP Server Recovery – The Proper Way

Howdy!

If you ever happen to be tasked with recovery of CUCM IM & Presence (a newer name for CUP) server, perhaps this post will help you.

Disclaimer: The following recovery process worked for me (and I have a number of successful recoveries under my belt), and while every step has been taken to provide my readers with accurate information, please use your discretion before taking any decisions based on the contents of this post. You may want to validate some or all of the steps with a Cisco TAC engineer.

Step 1: Preserve your existing backups! If you have DRF backups in place, save them by copying the backup files to a safe place. Why? Existing backup copies can be overwritten by newer backup jobs (say, in case the restore process takes you longer than expected and you have selected to keep only a couple of most recent backups when you configured Backup Device in DRS).

Step 2: In CUCM, unassign all users from the existing Presence Group.

Step 3: Delete Presence Group and delete the failed CUP server from System -> Server in CUCM.

Step 4: Add the CUP node back to CUCM with the same name under System -> Server. A default Presence Group is created and the CUP node is added to it – that’s fine.

Step 5: Proceed with a fresh install of the CUP node. Note: the version should match exactly the one of the failed node.
Hint: all CUP ISOs that are available for download on CCO are bootable, so you do not have to use any tricks to turn non-bootable ISO into a bootable one.

Step 6: Proceed with DRS recovery. Now, this is important: you must perform full cluster recovery (restore both CUP and CUCM) from your backup. Why? Well, since the CUP node has been deleted and re-added in steps 3 and 4 above, the CUP server will have a new PKID in CUCM database. If you just recover the CUP node without recovering CUCM database, the node will have a different (old) PKID and thus would no longer match new PKID recorded in CUCM. As a result, certain services will not start in CUP and you will see the following error in CUP: “The IM&P Publisher node was deleted from the CUCM server list. This node needs to be reinstalled.”

Step 7: Once the restore process completes, restart CUCM Pub first (utils system restart), wait for it to come up, then restart CUCM Sub and CUP Pub.

Step 8: Perform typical health checks of your CUCM and CUP nodes:

  • utils dbreplication status, followed by utils dbreplication runtimestate on your CUCM Pub to verify database replication between Pub and Sub nodes;
  • Launch RTMT, connect to CUCM Pub and review the alarms;
  • Perform diagnostics in CUP Pub (Diagnostics – > System Troubleshooter)

That’s it! Hope this helps someone.
How to Dump Install Logs to Serial Port – The Proper Way

Howdy! Those of you are struggling to follow the instructions of dumping the install logs to a serial port of a Cisco UC (CUCM/CUP/CUC) VM using any of the official public guides (see here and here), perhaps this post will help you. Here’s how it works in vSphere 5.x VMware environment:

  1. When the installation fails the first time, the system will prompt you to dump diagnostic information. Select “Yes”:
    prompt_to_dump_diag_info
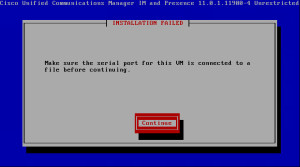
  2. The installer will further prompt you to connect the serial port before continuing. Hit “Continue”:
    attach_serial_prompt
  3. The installer will confirm that the dumping is complete (no, it ain’t, we know that). Hit “Continue” to halt the VM:
    continue_to_halt
  4. Once the VM shuts down, edit the hardware to add Serial Port:
    • Select “Serial Port” -> Next: 
      add_serial_port_1
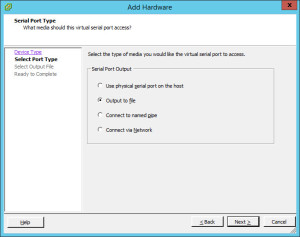
    • Select “Output to file” -> Next:
      add_serial_port_2
    • Browse the Datastores to the location you want to save the output to and type the name of the file (can be anything; in my example it is called “serial0.log”):
      add_serial_port_3
    • Accept the default settings (“Connect at power on” and “Yield CPU on poll”) -> Next:
      add_serial_port_4
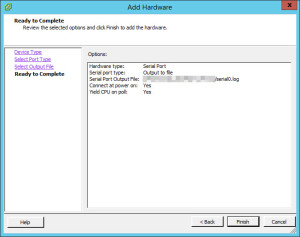
    • Confirm the additional hardware settings and hit “Finish”:
      add_serial_port_5
  5. Power on the VM that failed the install. The VM will boot and prompt you to dump the installation logs again:
    installation_failed
  6. Confirm that the serial port is attached and proceed with the dump of the diagnostic info to the Serial Port:
    dump_is_complete
  7. Important: Shutdown the VM. If you don’t, you will get the “File operation failed” error when you try to download the dump file:
    file_operation_failed
  8. Once downloaded, use 7-Zip to extract the logs (you will need to “unzip” the logs twice: extract serial0.log to serial0~ file, then extract that file to another folder to reveal the logs):
    contents_of_typical_install_dump

That’s it! Review the install logs (under \common\log\install\install.log) to figure out the problem with your installation or submit the logs to Cisco TAC engineer for analysis and further troubleshooting.

Hope this helps someone.

Two Issues, One Fix: SELinux Enforced vs. Permissive Mode

So I’m performing an upgrade of yet another CUCM and CUC clusters from 10.5.2 to 11.0.1 (my fifth this month!) and I get two separate issues post upgrade:

Issue #1: High CPU utilization on both Pub and Sub nodes post-upgrade to 11.0.1. The command “show process using-most cpu” shows “/usr/bin/python -Es /usr/sbin/setroubleshootd -f” process as using most CPU:

admin:show process using-most cpu
PCPU PID CPU NICE STATE CPUTIME ARGS
%CPU PID CPU NI S TIME COMMAND
64.5 18193 - 0 S 00:23:06 /usr/bin/python -Es /usr/sbin/setroubleshootd -f

Issue #2: VMware Tools are shown as “Not Running (Not Installed)” for one of the Unity Connection nodes. Re-installation of VMware Tools using any of the acceptable methods has no effect.

So what’s the fix?

Fix for Issue #1: Change the SELinux mode to permissive (utils os secure permissive) on all affected nodes (Note: this can also apply to Cisco Unity Connection appliance).

Fix for Issue #2: Change the SELinux mode to permissive (utils os secure permissive) and reinstall VMware Tools (utils vmtools refresh).
Note: DO NOT change security back to ‘enforced’ if you are running VMware Tools 10.0 or higher. Read more about this issue on Cisco’s Bug Search Tool: https://bst.cloudapps.cisco.com/bugsearch/bug/CSCux90747.

So what is SELinux anyway? Since Cisco UC servers are built on RHEL6, it’s best to turn to documentation from the source: https://access.redhat.com/documentation/en-US/Red_Hat_Enterprise_Linux/6/html/Security-Enhanced_Linux/index.html.

By changing the SELinux mode from the default ‘enforced’ to ‘permissive’, you are not disabling SELinux, but rather instruct SELinux to log rather than block access to files and/or processes.

Hope this helps someone.

CWMS 2.6 MR2 Is Here

A new maintenance release for Cisco WebEx Meetings Server 2.6 has been made available on CCO for download today. The build number for the CWMS is 2.6.1.39. Release notes have yet to be updated, but you can check the Bug Tracker for issues that were fixed with this release. More updates to follow.

UPDATE: The release notes for CWMS have been updated on April 18th, 2016. Here are the critical (sev. 2 and above) issues that were fixed in this release:

Identifier Severity Description
CSCuy07247 2 Evaluation of orion for OpenSSL January 2016
CSCuy36539 2 Evaluation of orion for glibc_feb_2016
CSCuy54028 2 Backup fails for new 2.6 Deployment for 2000 User system
CSCuy54463 2 Evaluation of orion for OpenSSL March 2016
CSCuy54464 2 Evaluation of orion for OpenSSL March 2016
CSCuz05792 2 SSlgw logs//system not purging logs older than 30 days
CSCuz08030 2 CWMS backup not working after changing NFS server

MRA: Unable to communicate with ‘servername’. UcxnError: ‘HTTPError:403’.

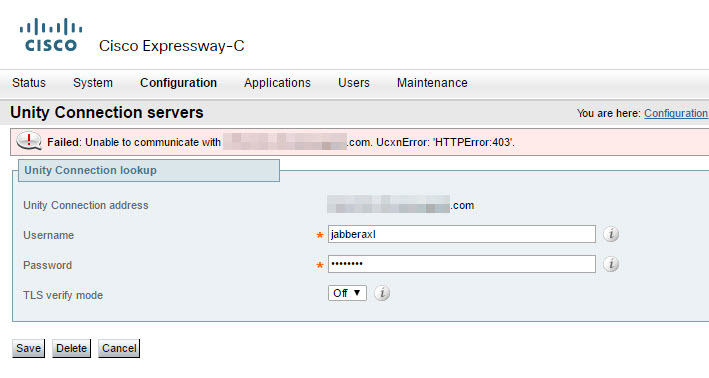
Have you seen this one on your MRA (Expressway): “Failed: Unable to communicate with <server name>. UcxnError: ‘HTTPError:403‘”?  It happens when you try to add or re-add the Unity Connection node on Expressway under Configuration -> Unified Communications -> Unity Connection servers:

UcxnError HTTPError 403

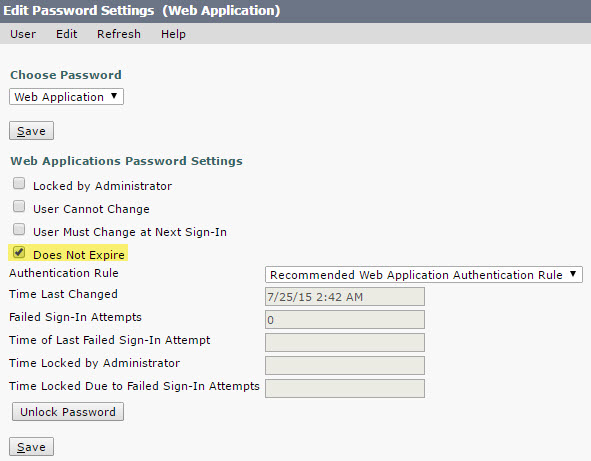
Check if the password that is being used for the connection has expired. The solution is to tick the “Does Not Expire” check box for the user account that is used for the integration:

UnityConnection Web Application account password

It’s a simple thing to miss when you implement MRA for Ucxn nodes. Hope this saves somebody some time.

OpenSSL January 2016 Vulnerability

Cisco has released a patch for OpenSSL January 2016 vulnerability that is described in CVE-2016-0701 and also on Cisco’s Bug Tracker: CSCuy07473. The patch ciscocm.ciscossl_11.0.1-v5_4_3.k3.cop.sgn comes in a form of a COP file can be downloaded off CCO for version 11.0(1) or 10.5(2). No reboot is required after applying the patch, but installation after business hours is recommended. For more information, please consult the published Release Notes for version 11.0(1) or 10.5(2) for this update.