Cisco Phone Security: End-to-End Signalling and Media Encryption with SME

Hello folks!

For those of you who are in charge of a large VoIP environment with multiple CUCM clusters, I dedicate this post. This is going to be a multi-part document, since the topic being covered is rather large and I want to be as detailed as possible.

The Environment

Topology Diagram

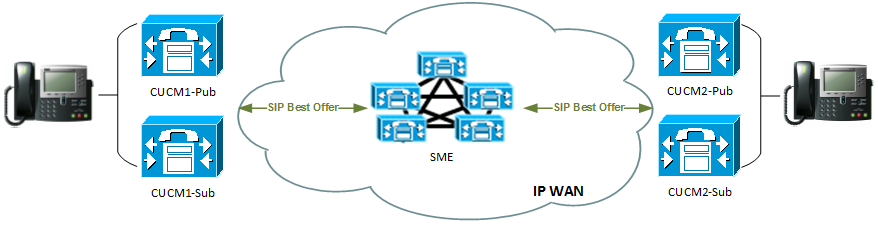
We are dealing with two CUCM clusters that have SIP trunks to Cisco SME cluster. In reality, the environment is a much larger one, consisting of 12 multi-node CUCM clusters scattered around the globe. I have intentionally simplified the topology to include just three CUCM clusters, with one of them being used as SME.

The Challenge

In this particular case, the client would like to implement end-to-end phone security (signalling and media encryption) on all endpoints that support it. Because the traffic is traversing SME, we need to make sure that the SIP trunks between CUCM and SME clusters are secure. In a traditional two-cluster scenario, all you need to do is to follow this awesome guide by Jason Burns, where we exchange CallManager.pem self-signed certificates between all nodes, configure SIP Trunk Security Profile and off we go. But imagine doing that certificate exchange with 12 multi-node clusters!

The Solution

We are going to use our own Enterprise CA to issue new CallManager certificates for all CUCM clusters and import the Root CA certs only to trust the issuer. Here’s the detailed guide on how to achieve just that.

Part 1: Preparing Enterprise CA and Issuing the Certs

Note: it is assumed that you have all the necessary rights to work with your Windows Server-based Certificate Authority. 

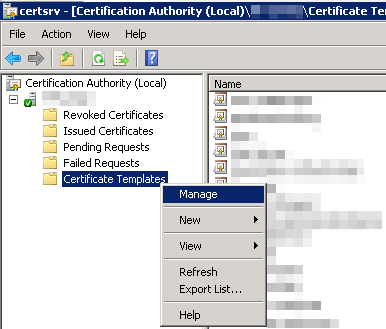
Step 1: Using Certificate Authority Add-In, connect to your Root or Subordinate CA, navigate to ‘Certificate Templates’, right-click and select ‘Manage’:

Certificate Authority - Manage

Step 2: In the ‘Certificate Templates Console’ that will open, right-click on any existing certificate and select ‘Duplicate Template’. When prompted, select ‘Windows Server 2003 Enterprise’ version for the duplicate.

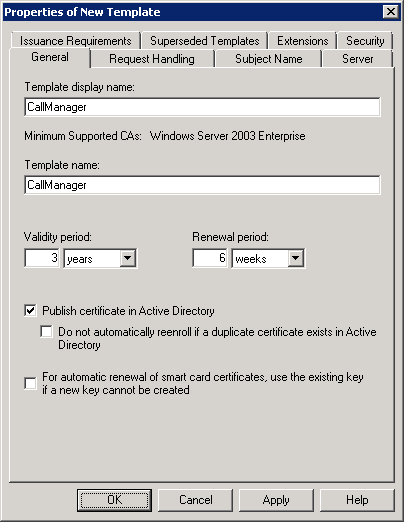
Step 3: In the ‘Properties of New Template’ window, give certificate template a name (e.g. “CallManager”), choose validity period (higher is good, but note that the certificate validity period should be less than of the issuing CA’s), and put a check mark on ‘Publish certificate in Active Directory’ box:

New Certificate Template Properties

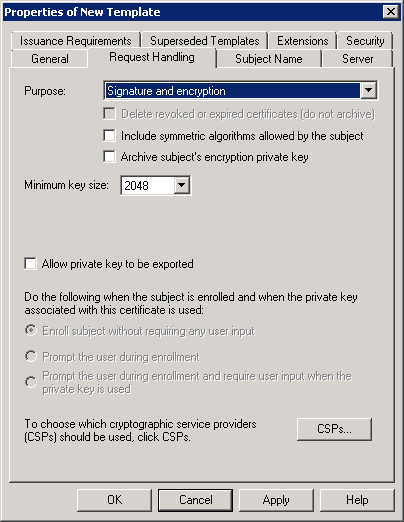
Step 4: Under ‘Request Handling’ tab, make sure that ‘Signature and encryption’ is selected for the certificate purpose and the minimum key size is 2048 or greater bits.

Certificate Template Request Handling

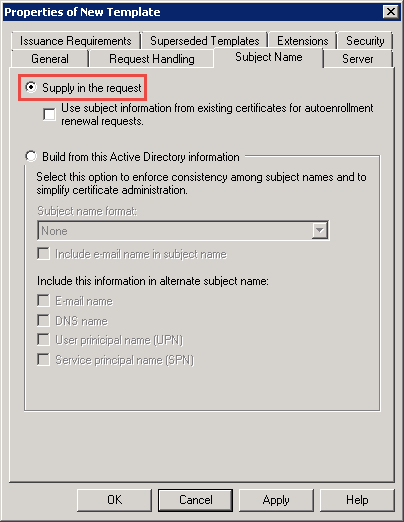
Step 5: Under ‘Subject Name’ tab, select the ‘Supply in request’ radio button:

Certificate Template Subject Name

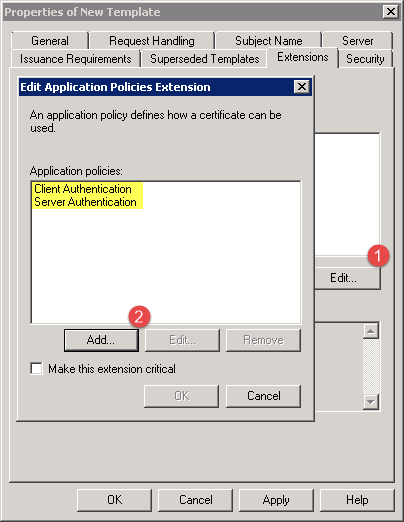
Step 6: Under ‘Extensions’ tab, click on the ‘Edit…’ button and ensure that ‘Client Authentication’ and ‘Server Authentication’ application policies are selected:

Certificate Template Extensions

Step 7: Under ‘Security’ tab, make sure that your user account has the necessary permissions, allowing you to Read, Write, and Enroll certificates using this template.

Step 8: Leave all other values at their default and click “OK” to create the new certificate template. Close the ‘Certificate Template Management’ window and return to the ‘Certification Authority’ console.

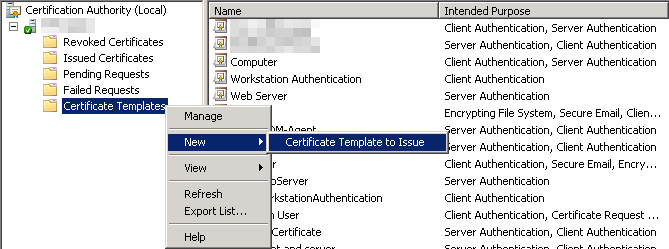
Step 9: Back in the ‘Certification Authority’ console, right-click on the “Certificate Templates” and select ‘New’ -> ‘Certificate Template to Issue”. Select the new template that was created in the previous steps (“CallManager”):

Certification Authority - New Template


Now you are ready to issue the actual certificate for your CallManager clusters using CA’s web-based AD Certificate Services (https://your-CA-FQDN/certsrv).

Part 2: Requesting, Issuing and Installing CallManager Certificates

The following steps are required to be completed on all CUCM nodes, including the SME ones.

Step 1: Navigate to Cisco Unified OS Administration site of your first cluster’s publisher node (https://CUCM-1/cmplatform).

Step 2: Go to Security -> Certificate Management and click ‘Find’ to display a list of current certificates.

Step 3: To enable SIP trunk encryption, we are going to generate a new certificate request file (CSR) for CallManager certificate type, so click on ‘Generate CSR’, select ‘CallManager’ for the certificate purpose, select ‘Multi-server (SAN)’ for distribution type:

Generate CallManager CSR

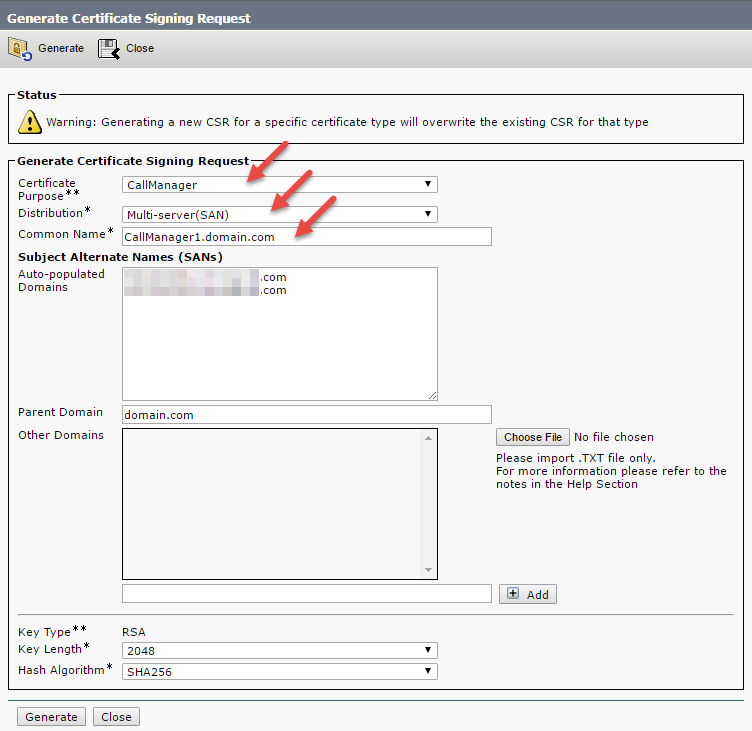
Note: for my Multi-Server (SAN) certificates, I typically edit the CN (Common Name) to match the Publisher’s FQDN. Why? This reduces the required number of SANs, which is important if you are using third-party CA that limits the number of alternative names for the cert.

Step 4:  Download the newly-generated CSR, open it in notepad and copy the generated Base-64-encoded certificate request.

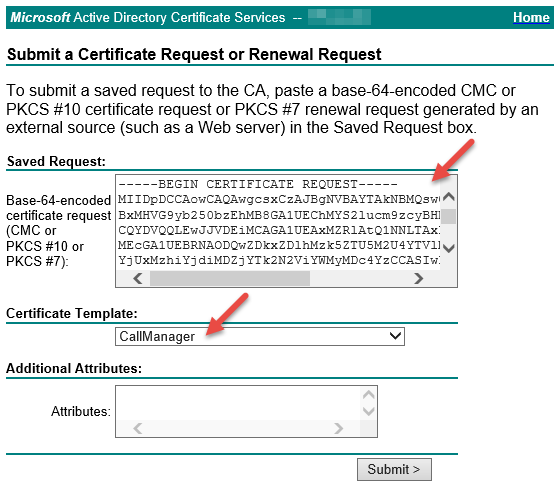
Step 5: Navigate to your CA’s Active Directory Certificate Services web-based UI (https://FQDN-of-your-CA/certsrv/), click on “Request a certificate” -> “Advanced certificate request” and paste the certificate request in the textbox. Select “CallManager” certificate template that was created in Part 1 of this guide and then click “Submit >”:

Submit Certificate Request

Step 6: Once the certificate has been generated, download it in Base-64-Encoded format.

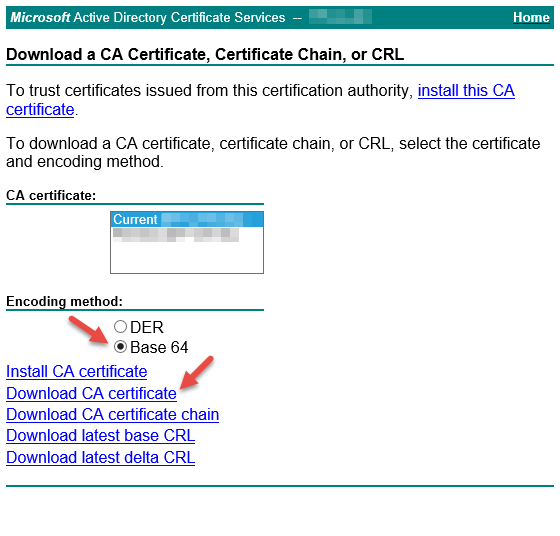
Step 7: Back to CA AD Certificate Services Web GUI, click on “Home” link in the upper-right corner to return to the main page and click on “Download a CA certificate, certificate chain, or CRL” link. Select the current CA certificate, and ‘Base 64’ for the encoding method, then click “Download CA certificate”.

Download CA Certificate

Important: If the certificate has been issued by your subordinate CA, you need to separate your Root CA certificate from Subordinate CA certificate. Here’s how:

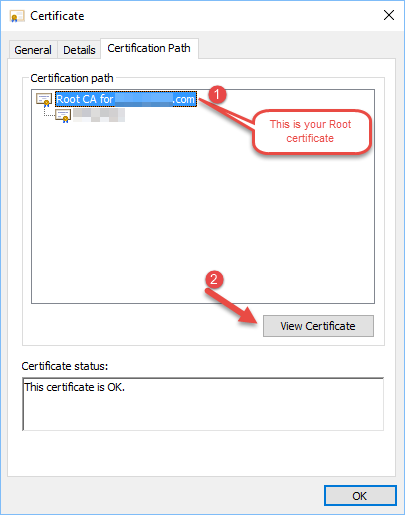
  1. Open the CA certificate that was downloaded in Step 7 above and navigate to “Certification Path” tab.
  2. Select the “Root CA for [yourdomain]”, then click “View Certificate”:
    Viewing Root CA certificate
  3. In the new ‘Certificate’ window that will open, click on “Details” tab and then click “Copy to File…” button that would open Certificate Export Wizard.
  4. In the ‘Certificate Export Wizard’, click “Next” -> select “Base-64 encoded X.509 (.CER)” format and provide a path to save the file.

Step 8: Back to your CallManager’s OS Administration page, click on “Upload Certificate/Certificate Chain”.

  1. Upload the Root CA certificate as “CallManager-trust” type.
  2. If applicable, upload the Subordinate CA certificate as “CallManager-trust” type.
  3. Upload the CA-generated certificate as “CallManager” certificate.

Step 9: You will need to restart Cisco TFTP and CallManager services under Cisco Unified Serviceability page on all CallManager nodes in the cluster for the new certificate to take effect. Hold on to that just for now.

Part 3: Switching the cluster to Mixed-Mode

For the encryption to work on CallManager endpoints and trunks, you need to ensure that your CUCM clusters are switched from the default “Non-secure” mode to “Mixed-mode”. First, verify the cluster mode on all of your CallManager clusters by navigating to System -> Enterprise Parameters -> ‘Cluster Security Mode’:

Verifying cluster security mode

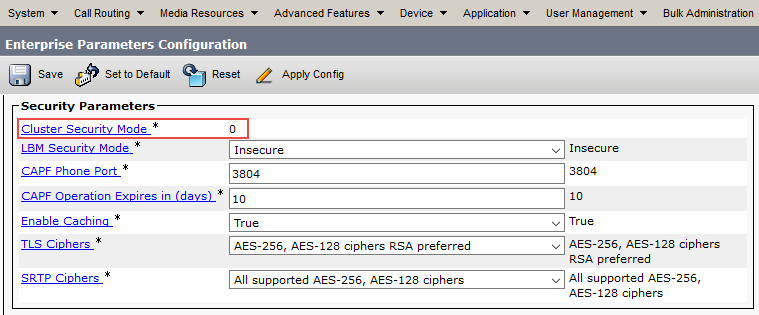
If the value is “0”, then the cluster is in “Non-secure” mode and need to be switched to “Mixed-mode” by following these steps.

Step 1: Open an SSH session with your CallManager Publisher in Cluster 1.

Step 2: Issue “utils ctl set-cluster mixed-mode” command:

admin: utils ctl set-cluster mixed-mode
This operation will set the cluster to Mixed mode. Do you want to continue? (y/n): y
Moving Cluster to Mixed Mode
Cluster set to Mixed Mode
Please Restart Cisco Tftp, Cisco CallManager and Cisco CTIManager services on all nodes in the cluster that run these services.

Step 3: Restart Cisco TFTP, Cisco CallManager and Cisco CTI Manager on all nodes in the cluster.

Important: If your cluster was already in Mixed-mode, you need to regenerate CTL certificates after replacing CallManager certificates on your CallManager cluster that we did in Part 2.

admin:utils ctl update CTLFile 
This operation will update the CTLFile. Do you want to continue? (y/n): y

Updating CTL file
CTL file Updated
Please Restart the TFTP and Cisco CallManager services on all nodes in the cluster that run these services

If you are using Cisco Jabber in your environment and you omit the above step, the first indication that something went wrong after CallManager certificate replacement would be your Jabber’s phone services not working for any device types (CSF, TCT, etc.). If you review the jabber.log in Jabber’s PRT report, you may see the following errors:
2016-09-09 09:39:07,736 ERROR [0x00001e14] [ice\TelephonyAdapterServerHealth.cpp(66)] [jcf.tel.adapter] [CSFUnified::TelephonyAdapter::getConnectionIpProtocol] - No connected ConnectionInfo of type: [eSIP]. Could not determine connection IP Protocol
2016-09-09 09:39:07,736 DEBUG [0x00001e14] [\impl\TelephonyServerHealthImpl.cpp(279)] [jcf.tel.health] [CSFUnified::TelephonyServerHealthImpl::updateHealth] - updating health with serverType [CucmSoftphone] serverHealthStatus [Unhealthy] serverConnectionStatus [Disconnected] serverAddress [CUCM1.domain.com (CCMCIP)] serviceEventCode [UnknownConnectionError] transportProtocol [SIP] ipProtocol [Unknown]

This is fixed by regenerating CTL files and restarting TFTP and CallManager cervices on all nodes in the cluster.

We shall continue the setup with Part 4 in the next post. Stay tuned!

Two Issues, One Fix: SELinux Enforced vs. Permissive Mode

So I’m performing an upgrade of yet another CUCM and CUC clusters from 10.5.2 to 11.0.1 (my fifth this month!) and I get two separate issues post upgrade:

Issue #1: High CPU utilization on both Pub and Sub nodes post-upgrade to 11.0.1. The command “show process using-most cpu” shows “/usr/bin/python -Es /usr/sbin/setroubleshootd -f” process as using most CPU:

admin:show process using-most cpu
PCPU PID CPU NICE STATE CPUTIME ARGS
%CPU PID CPU NI S TIME COMMAND
64.5 18193 - 0 S 00:23:06 /usr/bin/python -Es /usr/sbin/setroubleshootd -f

Issue #2: VMware Tools are shown as “Not Running (Not Installed)” for one of the Unity Connection nodes. Re-installation of VMware Tools using any of the acceptable methods has no effect.

So what’s the fix?

Fix for Issue #1: Change the SELinux mode to permissive (utils os secure permissive) on all affected nodes (Note: this can also apply to Cisco Unity Connection appliance).

Fix for Issue #2: Change the SELinux mode to permissive (utils os secure permissive) and reinstall VMware Tools (utils vmtools refresh).
Note: DO NOT change security back to ‘enforced’ if you are running VMware Tools 10.0 or higher. Read more about this issue on Cisco’s Bug Search Tool: https://bst.cloudapps.cisco.com/bugsearch/bug/CSCux90747.

So what is SELinux anyway? Since Cisco UC servers are built on RHEL6, it’s best to turn to documentation from the source: https://access.redhat.com/documentation/en-US/Red_Hat_Enterprise_Linux/6/html/Security-Enhanced_Linux/index.html.

By changing the SELinux mode from the default ‘enforced’ to ‘permissive’, you are not disabling SELinux, but rather instruct SELinux to log rather than block access to files and/or processes.

Hope this helps someone.

Login Failed: AD Authentication Breaks After Upgrading BIG-IP LTM to v12.x

If you happen to have F5’s BIG-IP LTMs in your environment and have gone to upgrade the software to the latest-and-greatest release 12.0 (to address some of the discovered vulnerabilities), you may have noticed that AD authentication against Remote Role Groups fails with “Login failed” error:

F5 LTM Login Failed

Well, that’s a bug, alright. As with most of the bugs, there’s a workaround, so follow these steps:

  1. Login to the LTM’s WebUI with your local admin account
  2. Go to System -> Users -> Remote Role Groups
  3. For all Remote Role Groups that contain space character in the Attribute String (that is, there’s a space in the DN of a group), replace space with ‘\20’.

Example:

Original: memberOf=CN=LTM_Admins,OU=Some Groups,OU=Some Org Unit,DC=Domain,DC=com
Modified: memberOf=CN=LTM_Admins,OU=Some\20Groups,OU=Some\20Org\20Unit,DC=Domain,DC=com

That should be it!

Server Identity Cannot Be Verified

There was an interesting case that was brought to my attention just the other day: a SAN SSL certificate for the Exchange environment has been replaced and properly installed on all Internet-facing Client Access Servers, reverse proxy servers, and load balancers. The SAN certificate contained all the required subject names for autodiscover, OWA and EWS to work without a hitch. All initial tests did not reveal any problems with the certificate replacement. It was a day or two later when some users started complaining about the error that popped up on their mobile devices about certificate not being fully trusted, when they tried accessing Webmail/ECP from a mobile device. The problem affected iOS and Android users alike, but only certain browsers on those platforms were complaining (e.g. Chrome for iPhone worked fine (i.e. trusted the new cert), but Safari for iPhone did not). Also, the issue was only affecting clients that connect from internal network (clients connecting from the Internet were not affected). I’ve narrowed it down to the load balancer (F5 LTM) where the users are pointed to for internal access to OWA/ECP.

I recalled a similar case with CWMS certificate replacement, when WebEx for iPhone/Android apps did not trust third-party CA issued SAN certificate. The fix for it was to chain the certificate with intermediary and root certs prior to importing into CWMS (click here for more info). So I decided to give it a try and upload a chained cert to the F5 LTM. This solved the problem. Here’s what you need to do:

  1. Download the server, root and intermediary certs from the issuing CA (e.g. GoDaddy).
  2. In a text editor of your choice (which should be Notepad++, naturally) combine server, root and intermediary certs in the following order:
    1. server cert
    2. intermediary cert
    3. root cert
  3. Export the certificate with key from Exchange in PKCS#12 format
  4. Export the certificate’s private key using openssl
  5. Upload the new (chained) cert to F5 LTM (System -> File Management -> SSL Certificate List -> Import
  6. Upload cert key

In newer versions of LTM (v.11 and above, I think), you can import PKCS#12 certificate directly. So you can skip the openssl part in step #4 and just import PKCS#12 cert first (which includes private key), then re-upload the chained cert overwriting existing (non-chained) certificate.

Hope this will help someone.

Bash Environment Variable Patch for UCM versions 8, 9 and 10

Update: The patch is also applicable to Cisco Unity Connection versions 8.5.1 and up. I have updated the post to reflect this information.

With yet another vulnerability that has become public in the recent week, vendors are scrambling to issue security patches for their systems. Cisco is no exception here, and that’s a good thing. On October 1st Cisco has released bash environment patch for CUCM/CUC versions 8, 9 and 10 to protect these systems from Shellshock bug. All future software updates for CallManager/Unity Connection versions that have not reached E-O-M will be released with the patch included. But for now, affected customers should download and install ciscocm.bashupgrade.cop.sgn available on CCO under Products > Unified Communications Call Control Cisco Unified Communications Manager (CallManager) > Cisco Unified Communications Manager Version x.x > Unified Communications Manager / CallManager / Cisco Unity Connection Utilities-COP-Files.

The update does not require system reboot, but Cisco advises to make a backup copy just in case. Be sure to check patch installation instructions and you may also want to review the CSCur00930 (CUCM) and CSCur05328 (CUC) on the Bug Tracker for more information.

Stay safe!

Confirmed Vulnerabilities in Cisco WRF and ARF Players

Cisco has issued a new Security Advisory confirming vulnerabilities in its WebEx Recording Format (WRF) and Advanced Recording Format (ARF) Players. WebEx Business Suite (cloud) clients should upgrade their WebEx software client to the latest version. The following client builds of Cisco WebEx Business Suite (WBS27, WBS28, WBS29) and Cisco WebEx 11 correct these vulnerabilities:

  • Cisco WebEx Business Suite (WBS29) client builds T29.2 or later
  • Cisco WebEx Business Suite (WBS28) client builds T28.12 or later
  • Cisco WebEx Business Suite (WBS27) client builds T27TLSP32EP16 (27.32.16) or later
  • Cisco WebEx 11 version 1.2.10 with client builds T28.12 or later
  • Cisco WebEx Meetings Server client builds 2.0.0.1677 or later

Client builds of the Cisco WebEx Business Suite prior to T27 SP32 have reached end of support; to obtain fixed software please upgrade to the latest version.

Cisco WebEx Meetings Servers (on-prem) clients should upgrade to version 2.0 or later (the most current version is 2.0 MR3).

To read the full Security Advisory go to http://tools.cisco.com/security/center/content/CiscoSecurityAdvisory/cisco-sa-20140507-webex.

Heartbleed and Vulnerabilities Discovered in Cisco UC Line

You can’t look anywhere these days without seeing news about Heartbleed – the new vulnerability discovered with OpenSSL 1.01/1.02. Vendors frantically started releasing security patches to fix affected applications, and Cisco was no exception. From the list of affected products, the following fall under UC domain:

Yup, pretty much 90% of affected products were Voice, Video and Conferencing related (click here to see the full list).

Our own vulnerability scanner discovered that Cisco Jabber Guest (EAP 7) is also vulnerable, so if you, like myself, are a member of the privileged Collaboration User Group and participate in Cisco Jabber Guest Beta trial, make sure that you minimize your risk exposure by controlling access to Jabber Guest server until the update/patch becomes available.

Stay tuned and keep safe!