How to Dump Install Logs to Serial Port – The Proper Way

Howdy! Those of you are struggling to follow the instructions of dumping the install logs to a serial port of a Cisco UC (CUCM/CUP/CUC) VM using any of the official public guides (see here and here), perhaps this post will help you. Here’s how it works in vSphere 5.x VMware environment:

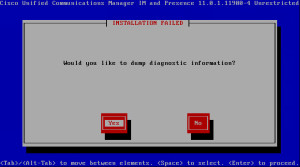
  1. When the installation fails the first time, the system will prompt you to dump diagnostic information. Select “Yes”:
    prompt_to_dump_diag_info
  2. The installer will further prompt you to connect the serial port before continuing. Hit “Continue”:
    attach_serial_prompt
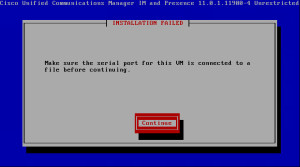
  3. The installer will confirm that the dumping is complete (no, it ain’t, we know that). Hit “Continue” to halt the VM:
    continue_to_halt
  4. Once the VM shuts down, edit the hardware to add Serial Port:
    • Select “Serial Port” -> Next: 
      add_serial_port_1
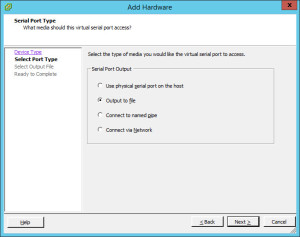
    • Select “Output to file” -> Next:
      add_serial_port_2
    • Browse the Datastores to the location you want to save the output to and type the name of the file (can be anything; in my example it is called “serial0.log”):
      add_serial_port_3
    • Accept the default settings (“Connect at power on” and “Yield CPU on poll”) -> Next:
      add_serial_port_4
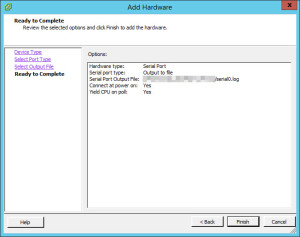
    • Confirm the additional hardware settings and hit “Finish”:
      add_serial_port_5
  5. Power on the VM that failed the install. The VM will boot and prompt you to dump the installation logs again:
    installation_failed
  6. Confirm that the serial port is attached and proceed with the dump of the diagnostic info to the Serial Port:
    dump_is_complete
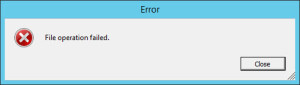
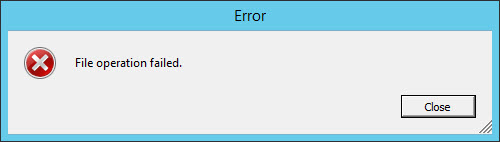
  7. Important: Shutdown the VM. If you don’t, you will get the “File operation failed” error when you try to download the dump file:
    file_operation_failed
  8. Once downloaded, use 7-Zip to extract the logs (you will need to “unzip” the logs twice: extract serial0.log to serial0~ file, then extract that file to another folder to reveal the logs):
    contents_of_typical_install_dump

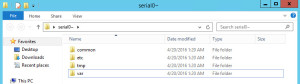
That’s it! Review the install logs (under \common\log\install\install.log) to figure out the problem with your installation or submit the logs to Cisco TAC engineer for analysis and further troubleshooting.

Hope this helps someone.

Two Issues, One Fix: SELinux Enforced vs. Permissive Mode

So I’m performing an upgrade of yet another CUCM and CUC clusters from 10.5.2 to 11.0.1 (my fifth this month!) and I get two separate issues post upgrade:

Issue #1: High CPU utilization on both Pub and Sub nodes post-upgrade to 11.0.1. The command “show process using-most cpu” shows “/usr/bin/python -Es /usr/sbin/setroubleshootd -f” process as using most CPU:

admin:show process using-most cpu
PCPU PID CPU NICE STATE CPUTIME ARGS
%CPU PID CPU NI S TIME COMMAND
64.5 18193 - 0 S 00:23:06 /usr/bin/python -Es /usr/sbin/setroubleshootd -f

Issue #2: VMware Tools are shown as “Not Running (Not Installed)” for one of the Unity Connection nodes. Re-installation of VMware Tools using any of the acceptable methods has no effect.

So what’s the fix?

Fix for Issue #1: Change the SELinux mode to permissive (utils os secure permissive) on all affected nodes (Note: this can also apply to Cisco Unity Connection appliance).

Fix for Issue #2: Change the SELinux mode to permissive (utils os secure permissive) and reinstall VMware Tools (utils vmtools refresh).
Note: DO NOT change security back to ‘enforced’ if you are running VMware Tools 10.0 or higher. Read more about this issue on Cisco’s Bug Search Tool: https://bst.cloudapps.cisco.com/bugsearch/bug/CSCux90747.

So what is SELinux anyway? Since Cisco UC servers are built on RHEL6, it’s best to turn to documentation from the source: https://access.redhat.com/documentation/en-US/Red_Hat_Enterprise_Linux/6/html/Security-Enhanced_Linux/index.html.

By changing the SELinux mode from the default ‘enforced’ to ‘permissive’, you are not disabling SELinux, but rather instruct SELinux to log rather than block access to files and/or processes.

Hope this helps someone.

MRA: Unable to communicate with ‘servername’. UcxnError: ‘HTTPError:403’.

Have you seen this one on your MRA (Expressway): “Failed: Unable to communicate with <server name>. UcxnError: ‘HTTPError:403‘”?  It happens when you try to add or re-add the Unity Connection node on Expressway under Configuration -> Unified Communications -> Unity Connection servers:

UcxnError HTTPError 403

Check if the password that is being used for the connection has expired. The solution is to tick the “Does Not Expire” check box for the user account that is used for the integration:

UnityConnection Web Application account password

It’s a simple thing to miss when you implement MRA for Ucxn nodes. Hope this saves somebody some time.

Cisco Unity Connection: “Failed to Send Message”

I took a long break from blogging, not because there’s nothing to blog about, but because I’ve been tremendously busy at work. Since my last post, I have moved the blog to another hosting provider (which by the way wasn’t a big deal: getting a new account, spinning a new WordPress instance and restoring posts and media from backups is super-easy these days), attended a Cisco Live! conference in San Diego (awesome experience), and migrated about half a dozen of telephony systems to Cisco Unified Communications Manager clusters (with voicemail, Jabber and all nine yards). Oh, and I have replaced my daily workhorse (a Dell Latitude for, well, another Dell Latitude).

Returning back to the topic of this post, I got frustrated trying to upload a WAV file with a greeting to a system call handler in Unity Connection, as Java was giving me the ambiguous “Failed to Send Message” error. The frustrating part was that I have already dealt with the issue a while ago, but the problem resurfaced with the new laptop of mine and I couldn’t remember what the fix was. You can obviously Google the error message and get a couple of links to posts on Cisco.com, but some of the info was not applicable for Unity Connection 10.5 that I was using. So for anyone out there who is looking for a definite solution, here it is.

To start, the issue is definitely JRE-related. After clicking about half a dozen of “Accept” Java security prompts and finally managing to launch the embedded Java applet in the Unity Connection greeting administration page, the “Failed to Send Message” appears after uploading WAV file and hitting the “Save” button.

First, figure out which JRE version is being used in the web page. To do that, open the task manager as you have the Greeting page with a Java applet opened. In the list of running processes locate the JRE process, right-click on it and select “Open File Location”:

jre_process

Next, launch the notepad as Administrator and open the java.policy file located under ..\lib\security\ folder and append the following lines anywhere between the “grant {” and “};” to add the required permissions:

permission java.net.SocketPermission "10.10.10.10:443", "connect,resolve";
// where 10.10.10.10 is the IP Address of your Cisco Unity Connection server
// and 443 is the default HTTPS port (for BE6K you would want to use 8443 instead).
// If you have multiple nodes, add each one in the same list
// It may also help to add the FQDN or the hostname of your Unity Connection, if you open the admin page by using either of the two:
permission java.net.SocketPermission "cuc-01.mydomain.com:443", "connect,resolve";
// where cuc-01.mydomain.com is the FQDN of your Cisco Unity Connection server

Close the file, saving changes, re-launch the web browser and try again. It should work this time.