Two Issues, One Fix: SELinux Enforced vs. Permissive Mode

So I’m performing an upgrade of yet another CUCM and CUC clusters from 10.5.2 to 11.0.1 (my fifth this month!) and I get two separate issues post upgrade:

Issue #1: High CPU utilization on both Pub and Sub nodes post-upgrade to 11.0.1. The command “show process using-most cpu” shows “/usr/bin/python -Es /usr/sbin/setroubleshootd -f” process as using most CPU:

admin:show process using-most cpu
PCPU PID CPU NICE STATE CPUTIME ARGS
%CPU PID CPU NI S TIME COMMAND
64.5 18193 - 0 S 00:23:06 /usr/bin/python -Es /usr/sbin/setroubleshootd -f

Issue #2: VMware Tools are shown as “Not Running (Not Installed)” for one of the Unity Connection nodes. Re-installation of VMware Tools using any of the acceptable methods has no effect.

So what’s the fix?

Fix for Issue #1: Change the SELinux mode to permissive (utils os secure permissive) on all affected nodes (Note: this can also apply to Cisco Unity Connection appliance).

Fix for Issue #2: Change the SELinux mode to permissive (utils os secure permissive) and reinstall VMware Tools (utils vmtools refresh).
Note: DO NOT change security back to ‘enforced’ if you are running VMware Tools 10.0 or higher. Read more about this issue on Cisco’s Bug Search Tool: https://bst.cloudapps.cisco.com/bugsearch/bug/CSCux90747.

So what is SELinux anyway? Since Cisco UC servers are built on RHEL6, it’s best to turn to documentation from the source: https://access.redhat.com/documentation/en-US/Red_Hat_Enterprise_Linux/6/html/Security-Enhanced_Linux/index.html.

By changing the SELinux mode from the default ‘enforced’ to ‘permissive’, you are not disabling SELinux, but rather instruct SELinux to log rather than block access to files and/or processes.

Hope this helps someone.
CWMS 2.6 MR2 Is Here

A new maintenance release for Cisco WebEx Meetings Server 2.6 has been made available on CCO for download today. The build number for the CWMS is 2.6.1.39. Release notes have yet to be updated, but you can check the Bug Tracker for issues that were fixed with this release. More updates to follow.

UPDATE: The release notes for CWMS have been updated on April 18th, 2016. Here are the critical (sev. 2 and above) issues that were fixed in this release:

Identifier Severity Description
CSCuy07247 2 Evaluation of orion for OpenSSL January 2016
CSCuy36539 2 Evaluation of orion for glibc_feb_2016
CSCuy54028 2 Backup fails for new 2.6 Deployment for 2000 User system
CSCuy54463 2 Evaluation of orion for OpenSSL March 2016
CSCuy54464 2 Evaluation of orion for OpenSSL March 2016
CSCuz05792 2 SSlgw logs//system not purging logs older than 30 days
CSCuz08030 2 CWMS backup not working after changing NFS server

MRA: Unable to communicate with ‘servername’. UcxnError: ‘HTTPError:403’.

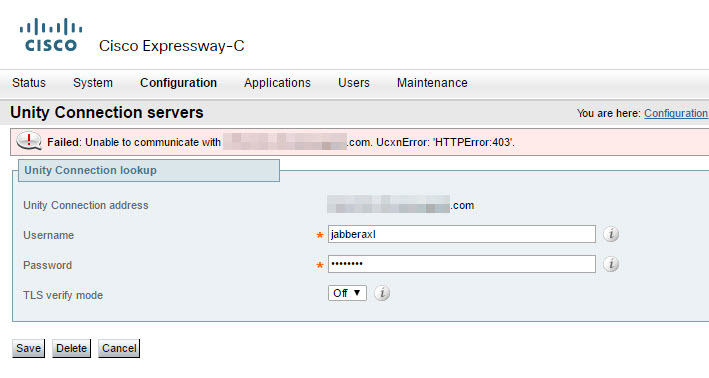
Have you seen this one on your MRA (Expressway): “Failed: Unable to communicate with <server name>. UcxnError: ‘HTTPError:403‘”?  It happens when you try to add or re-add the Unity Connection node on Expressway under Configuration -> Unified Communications -> Unity Connection servers:

UcxnError HTTPError 403

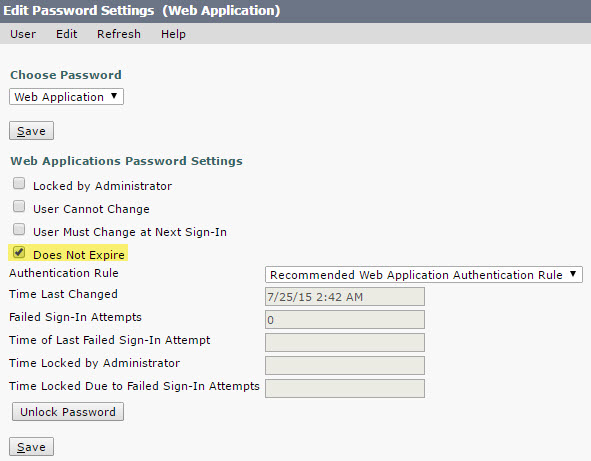
Check if the password that is being used for the connection has expired. The solution is to tick the “Does Not Expire” check box for the user account that is used for the integration:

UnityConnection Web Application account password

It’s a simple thing to miss when you implement MRA for Ucxn nodes. Hope this saves somebody some time.

OpenSSL January 2016 Vulnerability

Cisco has released a patch for OpenSSL January 2016 vulnerability that is described in CVE-2016-0701 and also on Cisco’s Bug Tracker: CSCuy07473. The patch ciscocm.ciscossl_11.0.1-v5_4_3.k3.cop.sgn comes in a form of a COP file can be downloaded off CCO for version 11.0(1) or 10.5(2). No reboot is required after applying the patch, but installation after business hours is recommended. For more information, please consult the published Release Notes for version 11.0(1) or 10.5(2) for this update.

Login Failed: AD Authentication Breaks After Upgrading BIG-IP LTM to v12.x

If you happen to have F5’s BIG-IP LTMs in your environment and have gone to upgrade the software to the latest-and-greatest release 12.0 (to address some of the discovered vulnerabilities), you may have noticed that AD authentication against Remote Role Groups fails with “Login failed” error:

F5 LTM Login Failed

Well, that’s a bug, alright. As with most of the bugs, there’s a workaround, so follow these steps:

  1. Login to the LTM’s WebUI with your local admin account
  2. Go to System -> Users -> Remote Role Groups
  3. For all Remote Role Groups that contain space character in the Attribute String (that is, there’s a space in the DN of a group), replace space with ‘\20’.

Example:

Original: memberOf=CN=LTM_Admins,OU=Some Groups,OU=Some Org Unit,DC=Domain,DC=com
Modified: memberOf=CN=LTM_Admins,OU=Some\20Groups,OU=Some\20Org\20Unit,DC=Domain,DC=com

That should be it!

CUP Publisher Installation Stalls/Fails

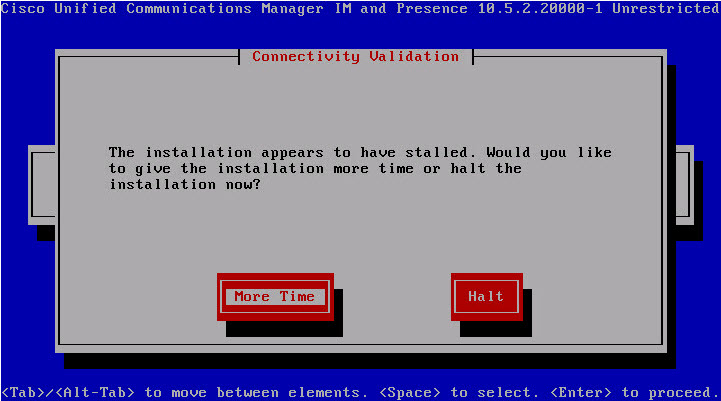
It looks like I’m hitting another Cisco bug, this time at the installation of CUP Publisher node for a recently recovered CUCM cluster of two nodes. The installation from a bootable ISO goes smooth for the most part of the process, but then stalls with no error right after completing Security Configuration (which is a step right after Call Manager Connectivity Validation):

CUP_Error

This bug is described in CSCuv74715. First, CUP installer will try to buy some time:

CUP_Time

Then, after you you click “More Time” it will run the validation tests for about 20 minutes, ultimately resulting in the blank Error page as seen above.

Problem is, there is no version 10.5(2.230000.1) of CUCM or CUP available on CCO.  So the solution is to obtain the latest available build of the CUP for the same version (10.5.2 in this case) from Cisco TAC (or create your own bootable iso from non-bootable ISO that can be downloaded from CCO) and retry the installation process.

UPDATE: I will save you some time: you do not need to download a new ISO if the only installer you have available is 10.5.2.20000-1. The error message that should have appeared as the 10.5.2.20000-1 installer stalls is as follows:

CUP_NTP

In my case, the NTP synchronization on CUCM Publisher had status of “unsynchronised, time server re-starting”. In this particular environment, the NTP reference servers were Domain Controllers (so Windows-based). Cisco UC VMs are quite finicky when it comes to synchronizing time with Windows-based NTP servers; the solution is to point the CUCM Publisher to a Linux-based NTP server.

In order to change the NTP server references for CUCM Pub, SSH to it and first confirm that NTP is operational by issuing “utils ntp status” command (just like it says in the error message). If the status is anything other than “synchronised to NTP server (xxx.xxx.xxx.xxx) at stratum x”, try to restart the NTP by issuing “utils ntp restart” command and checking the status again. If you do have a Linux-based NTP server, you can change the NTP server reference for Pub by doing the following:

  1. Add the new NTP server by issuing “utils ntp server add xxx.xxx.xxx.xxx” command
  2. Remove old NTP server(s) by issuing “utils ntp server detele” command and selecting the old NTP server(s) at the prompt.
  3. Confirm the NTP service restart when prompted.
  4. Check the NTP status again by issuing “utils ntp status” command.

Once the NTP status shows synchronized, proceed with CUP server installation.

Hope this helps someone.

Jabber and Surface Pro 4

Those of you who have customers with Microsoft Surface Pro 4 tablet (or who are users of Pro 4 him/herself), please note that there is a known defect with Cisco Jabber for Windows and Cisco Jabber for TelePresence (formerly Movi) that affects video quality. The video from camera in both Jabber clients produces a green tint and as of this writing (Feb 17th, 2016), no fix is available from Cisco. This defect is documented under CSCuy18230, so you may want to track it on Cisco’s Bug Search tool. I promise to post an update when I hear about any progress from Cisco Jabber’s dev team.

Server Identity Cannot Be Verified

There was an interesting case that was brought to my attention just the other day: a SAN SSL certificate for the Exchange environment has been replaced and properly installed on all Internet-facing Client Access Servers, reverse proxy servers, and load balancers. The SAN certificate contained all the required subject names for autodiscover, OWA and EWS to work without a hitch. All initial tests did not reveal any problems with the certificate replacement. It was a day or two later when some users started complaining about the error that popped up on their mobile devices about certificate not being fully trusted, when they tried accessing Webmail/ECP from a mobile device. The problem affected iOS and Android users alike, but only certain browsers on those platforms were complaining (e.g. Chrome for iPhone worked fine (i.e. trusted the new cert), but Safari for iPhone did not). Also, the issue was only affecting clients that connect from internal network (clients connecting from the Internet were not affected). I’ve narrowed it down to the load balancer (F5 LTM) where the users are pointed to for internal access to OWA/ECP.

I recalled a similar case with CWMS certificate replacement, when WebEx for iPhone/Android apps did not trust third-party CA issued SAN certificate. The fix for it was to chain the certificate with intermediary and root certs prior to importing into CWMS (click here for more info). So I decided to give it a try and upload a chained cert to the F5 LTM. This solved the problem. Here’s what you need to do:

  1. Download the server, root and intermediary certs from the issuing CA (e.g. GoDaddy).
  2. In a text editor of your choice (which should be Notepad++, naturally) combine server, root and intermediary certs in the following order:
    1. server cert
    2. intermediary cert
    3. root cert
  3. Export the certificate with key from Exchange in PKCS#12 format
  4. Export the certificate’s private key using openssl
  5. Upload the new (chained) cert to F5 LTM (System -> File Management -> SSL Certificate List -> Import
  6. Upload cert key

In newer versions of LTM (v.11 and above, I think), you can import PKCS#12 certificate directly. So you can skip the openssl part in step #4 and just import PKCS#12 cert first (which includes private key), then re-upload the chained cert overwriting existing (non-chained) certificate.

Hope this will help someone.

CWMS 2.5 MR6 is here

This Maintenance Release, which was made available for download on CCO today, fixes quite a number issues, so an update is recommended. One of the fixes is a minor (perceived to be almost cosmetic) change to the order of dial-in numbers for audio: since November’s MR1 the order of the dial-in numbers has been changed to alphabetical. Prior to MR1, the order of dial-in numbers were as configured/shown in CWMS Admin interface (see CSCuu97168).

Please review the Release Notes for more information.